iAudioInterface2 supports many professional microphones, including those that require full 48 Volt phantom power.
For a detailed walk-through of mic calibration, see our calibration video.
The Basics
First, you need to know if your mic requires phantom power or not. In theory, a non-phantom power microphone will not be damaged by applying phantom power, since the phantom voltage is common mode and will be rejected, but it is possible depending on how you plug the mic in to damage it. Be especially careful with ribbon mics!
In this procedure, we will be setting the hardware mic preamp gain in iAudioInterface2, and setting two trim values in the calibration page in AudioTools.
You can also use microphone calibration files, if you have one for your microphone. Otherwise it will be assumed to be flat and no corrections will be applied.
Multiple Calibrations Supported
On the Input Source page, you will initially see two entries: iAI Mic, and iAI Line Input. If you have only one microphone, you will use the first entry. But if you have more than one mic, or end up getting another one later, you can always tap the + button and add a new mic calibration entry.
And, you can delete entries that you have added by swiping left on the entry, and tapping the Delete button that appears.
Understanding Mic Ranges and Gain Ranges
AudioTools supports the concept of 2 mic ranges, High and Low. This lets you quickly select an appropriate range, based on your situation. Think of this as having two stored calibrations for your mic that you can pick at any time.
The low range will be set up to work best in quiet situations, and the high range will be setup to work in loud environments.
In order to set these, you will be adjusting the amount of preamp gain that iAudioInterface2 applies. This is called the “gain range”, and is a hardware setting, like a gain control knob on a typical mic preamp. Since our gain ranges are fixed, they are repeatable, and perfect for test and measurement, because you will always get the correct calibrated level, without worrying about nudging a level control and ruining your calibration.
So in these instructions, we will explain how to set the hardware gain ranges in iAudioInterface2 to create two mic ranges in AudioTools.
The Calibration Screen
The Calibration Screen is accessed from the Input Sources screen, after you select Microphone Calibration.
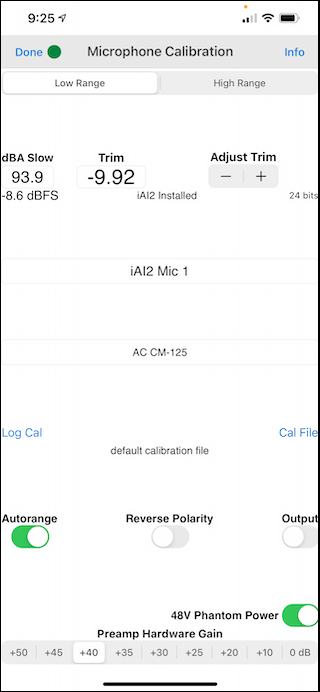
The calibration screens has these fields:
Range – Low or High
Selects the gain range that the values on the screen apply to.
dBA Slow
Shows the actual dB that is being read from the mic. Can also be an input field.
Trim
The adjustment being added to calculate the dB value.
+ / –
Nudges the Trim value up or down.
dBFS
Shows how close to clipping (below 0 dBFS) you are.
Name Field
Name of the current mic. You can edit this.
Description Field
A text description of the mic. Change this description if you like.
Preamp Hardware Gain
The amount in dB of hardware preamp gain that iAudioInterface2 is adding.
48V Phantom Power
Turn microphone phantom power on or off.
Log Cal
Stores a time and date-stamped log file in the calibration folder.
Cal File
Brings up the Calibration File screen to apply a microphone calibration file to this mic.
Autorange
Setting to turn auto-range on or off (used by some modules).
Output
Turn on to listen to the mic, or off to avoid feedback.
Calibrating with a Calibrator
If you have access to a calibrator, follow these instructions. This assumes a typical setup, with one more sensitive setting (low range) and one for louder situations (high range).
Before you plug the mic in, select the proper phantom power setting,
Now select Low Range, plug the mic in, and attach and turn on the calibrator.
Try different gain range settings (perhaps start with +20) and see how much headroom you have, by looking at the dBFS field. You want to get close to 0, but not too close. -7 to -2 dBFS would be perfect.
Once you have picked a gain range, now you can enter the calibrator value. If your calibrator is 94 dB SPL, just tap the dB field, clear it out (tap the tiny x) and enter 94, and press Done.
You should now see 94 in the dB field, and some value (doesn’t matter what) in the trim field. The app has set the Trim for you.
This one’s done, now let’s switch the high range.
Select High Range, and do the same thing, except this time you want more headroom. How much more? Depends how high you want to measure. If you allow 20 dB headroom (reading -20 dBFS), then you could measure 20 dB above the calibrator, or 114.
Want to measure 130 dB SPL? Leave 36 dB headroom above your 94 dB calibrator setting. You can go as high as you want, as long as your mic actually works at that level.
That’s it, your done. This calibration will be stored, and will be in effect automatically next time you start them app.
Calibrating by Comparison to a Calibrated Meter
This procedure is largely the same as calibrating with a calibrator, but you will be adjusting the Trim value up and down until the dB reading matches the dB reading of the reference meter.
Here are the steps.
Low Range Calibration
Select Low Range, set phantom power on or off, and connect the microphone.
Setup a speaker playing pink noise, at a moderately loud level, say 75 – 80 dB SPL. Set your reference meter to unweighted or C weighting.
Orient the test microphone and the reference meter microphone close together, pointing in the same direction.
Now select a gain range on the calibration screen that will give you about 20 to 25 dB of headroom, so the dBFS reading will be -20 to -25.
Adjust the Trim field, either by entering a number, or by using the + and – minus buttons, until the dB field reads the same value as the reference SPL meter.
High Range Calibration
Follow the same steps as above, but first select High range, and then select a preamp hardware gain setting that gives you 40 to 45 dB of headroom, so the dBFS reading will be -40 to -45.
Now adjust the Trim field until the dB reading on the screen matches the reference meter.
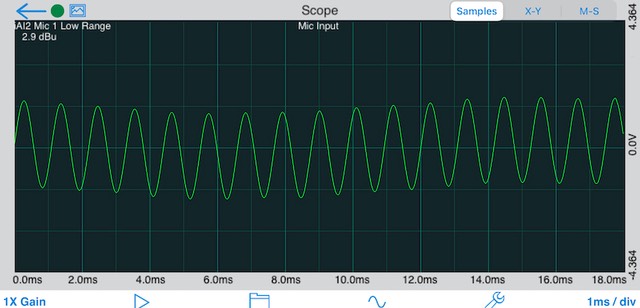
Being Absolutely Sure You Are Not Clipping
Since we have multiple tools in AudioTools, it’s easy to check that you haven’t set the gain too high. Just look at the waveform from the calibrator in the Audio Scope. Here’s how to do that:
The only tricky part is setting the scope to read the mic. Open the Audio Scope on the Line Input menu, and go to the Setup page, and set it like this:
* Line Input Mode – Mono
* Input Source – Mic
Now go back to the Scope screen, and turn on the calibrator. Make sure the correct mic range shows on the Scope screen, if not, change it in one of the Acoustic modules, like SPL Meter. Just look at the waveform, on 1X Gain and 1 ms / Div, and see how close to clipping you are. Anywhere below full screen is fine.
This shows a mic set to about -8 dBFS:
Calibrating Another iOS Device to This iAudioInterface2
If you have another iOS device, you can simply copy the Trim settings and enter them directly. Since the analog parts and converters are in iAudioInterface2, the same Trim values will work in another iOS device.
Calibrating for Extremely Low-Noise Microphones
Some microphones can measure very low noise levels, and if the noise floor of the mic is below 5 or 10 dB SPL, you may not be able to take advantage of its full capabilities, if you calibrate with a 94 dB SPL calibrator.
This is because the dynamic range of a 16-bit system such as this one is at most 96 dB, so it is possible that the noise floor of our system will be reached before the noise floor of the microphone, if the preamp gain range is set such that the upper clip point is near 94 dB.
To get around this, there are two methods. First would be to use and SPL attenuator, or a lower calibrator level, such as 74 dB SPL. If this is not possible, then the calibration can be translated down to a more sensitive range.
These are the steps needed for this process:
1) First, do the normal low-range calibration, as described above. Write down the Trim value and preamp gain range setting for this range, in case you want to go back to it.
2) Next, determine how much additional sensitivity is required. You may want another 10 or 20 dB of sensitivity, to take full advantage of your quite mic. Let’s call this value “x”.
3) Now, you will need a calibrated generator, set to 1000Hz. Plug the generator into the mic input, and reduce the generator level until you are reading “x” dB, below the calibrator level. For example, if you want an additional 20 dB of sensitivity, adjust the level so that the dB field reads 74.
4) Now set the preamp gain range higher by “x” dB (or slightly more). Adjust the Trim field value until you once again read the same 74 dB SPL.
This new Trim number is your “super-sensitive” Trim value, at the new preamp gain range. Remember, with these settings your mic will clip “x” dB sooner, so use the appropriate mic range.
Table of Typical Calibration Values
This table lists typical calibration Trim values for some microphones that we have tested. Given analog component tolerances, and microphone variations, you should be within a few dB if you use these values. Set the Polarity switch on the calibration page as indicated below.
Studio Six Digital CM-20, CM-120, and CM-125
- Low Range, +45 dB gain, -10.5 Trim
- High Range, +25 dB gain, -12.0 Trim
- Polarity: Reverse
Calibrating the Studio Six Digital CM-125:
Open the included pdf on the USB drive, and find the “Sensitivity” number in dB. It should be approximately -40.
Connect the microphone to iAudioInterface2, and with iAudioInterface2 connected to AudioTools, open the Microphone Settings page.
Low Range:
Select +45 gain. Compute the using this formula. Make sure that you get the minus signs in the formula.
Low Trim = -51 – sensitivity
The result should be within a few dB of -10.0. Enter this in the Trim field.
High Range:
Select +25 gain, and set the trim according to this formula, which is based on the Low range trim.
High Trim = Low Range Trim – 1.5
This should be within a few dB -11.5. Enter this in the Trim field.
Josephson C550H
- Low Range, +45 dB gain, -11.6 Trim
- High Range, +25 dB gain, -13.6 Trim
- Polarity: Normal
Earthworks M30
- Low Range, +35 dB gain, -11.34 Trim
- High Range, +10 dB gain, -7.31 Trim
- Polarity: Normal
Export / Import of Microphone Calibration Profiles
Once you have defined your microphone calibration profiles, you can export them in a text file, and then import them on another iOS device. It’s a good idea to keep a copy of your microphone profiles, in case you delete the app, which also deletes the profiles stored on the device.
Export
To export the profiles, tap the “Export” button, and then go to your browser as described above, navigate to the calibration folder, and download the profiles, which are stored in a file named “calibrationprofiles.txt”. Or, if you have Dropbox file synchronization enabled, the file will automatically appear in your Dropbox.
Import
If you already have a calibrationprofile.txt file stored on your device, you must first delete it. To do this, go to the Utility-Files page, tap the Documents button, select the calibration folder, tap Edit, and delete the file.
Now use your browser, as described above, to navigate to the calibration folder, which should now be empty. Select the file to upload from your computer, using the Select button on your browser, and then tap send.
Now go to the Settings-Microphone Setup page in AudioTools, and tap Import. After confirming, the profiles will be imported.
File Format
Calibration profiles are stored in plain text files, named calibrationprofiles.txt. The format of the file is a follows:
First line — header
Subsequent lines — calibration profiles for one microphone
The data is comma separated:
- name — text
- description — text
- phantom — 0 for off, 1 for on
- polarity reverse — 0 for normal, 1 for reversed
- compensation filename — text, name of compensation file, if any
- low trim — float, trim value
- low gain range — integer, gain selection index, 0 = max gain
- high trim — float, trim value
- high gain range — integer, gain selection index, 0 = max gain