This information is intended as a guide on creating projects and working within the HAA module. For information on any particular step and how to use it in a calibration, tap the “i in a circle” info button on the bottom of the screen, in the checklist window on the right of the screen.
For more information about the HAA Calibration system.
Screen Orientation and Devices
The HAA Home Cinema Calibration module (just called “HAA App” from here on) is designed to work properly in landscape mode on an iPad, or on a Mac computer with an M1 chip installed. These are the more recent models, including all of the current MacBooks.
The new 11” iPad Pro is a great option to run the app, and if you use the Apple keyboard case then the entire screen will be available for the app to use, even when you are typing. Recommended for PowerCal users.
Types of Calibration, TurboCal and PowerCal
There are two levels of home theater calibration that can be purchased, depending on your needs.
TurboCal – This system has been designed for use in a personal home theater. It has everything you need to evaluate, verify, test, and calibrate the audio in your home system, but it is not designed for professional use.
PowerCal – PowerCal includes everything in TurboCal, and adds professional reporting and detailed documentation. It also adds an installer profile, where as a pro installer you can enter details about your company name, logo, and other information. The app will also automaticaly pull your HAA credentials, if you have them, and app that data to the reports.
Once you have purchased a calibration system, just tap its menu item to get into the app.
Profile
For PowerCal users, tap the Profile button on the bottom left of the screen, and fill in all of the information about you and your company. This information will appear on all of your reports.
Creating a Project
From the Projects screen, tap the “+” button in the lower right corner. A box will appear where you will choose the number of main, sub, and ceiling speakers in your system. Select the match for your room, and tap Save in the upper left corner.
NOTE: Make sure you have the right configuration selected, as you cannot go back and change this basic parameter, since it affects the number of tests in the project.
The next screen that comes up allows you to enter all of the information about the room, including its size, seating arrangement, screen setup, and more. Fill in as much as you can here, since this information is used by the app in other functions.
Seating
The seating setup plays an important role in any home theater system. Take a little time to set this up, so the app can help with room design later on.
Each seating row is represented here in a table row on the screen. To edit it, make it is yellow (tap to select), and tap the Edit button just below this table. From here, you can adjust the number of seats, the row location, and the dimension of each seat. It’s fine to have one seat (like a couch), just adjust the dimensions to reflect this.
If you have more than one row, just tap the “+” below Seating Rows table, it will inherit from the row above it, and then tap and edit that row to make any changes.
There are other modules later on that will allow you to fine-tune the seating based things like room modes and viewing angles, this is just the starting point.
Screen
Enter as much information as possible about the screen. It’s particularly important to set the size, aspect ratio, and height off the floor. Again, this will be the starting point, and later modules will help adjust this if needed.
When you are done filling in this screen, tap Done in the upper left. You can come back later and make changes and additions if needed.
Project Management
Before we get into the actual project, let’s take a look at managing your projects.
Edit, Delete, Duplicate
You can Edit, Delete, or Duplicate a project by tapping it to select it (it will be highlighted in yellow) and tapping the appropriate button on the bottom of the screen. You cannot undo a delete, so make sure you really want to delete it.
Groups
If you have a number of projects, you can organize them into groups. To get started, tap the “Group” button on the bottom of the screen, and select “Create a New Group”. You will be prompted for a group name, enter it now.
Once you have one or more groups created, you can move projects from the Default Group into your groups.
You can Rename or Delete a group, just select any project in the group (or temporarily move a project into it, and select it) tap the Group button and select that function. Note that deleting a group does not delete any projects, they are just moved back into the Default Group.
Working with a Project
To start or resume work on a project, tap it to highlight it (yellow) and then tap the “i in a circle” button to the right, in its row. This will bring up the virtual room screen on the left, with the project checklist on the right.
Exiting back to the Project Screen
Make sure you are on the “Evaluation” checklist page, by tapping the “<“ if you are in another step, and then tap the “Done” button next to the word “Evalution”.
Selecting a Project Step
The app is broken into multiple stages, or steps. These are:
- Evaluation
- Verification
- Design Review
- Calibration
- Final Evaluation
- Report
You will start in Evaluation, complete the tasks in that step, move on to Verification, and so forth.
To change back and forth between steps, use the “<“ and “>” buttons in the checklist title bar.
Using the Scratchpad Editor
As you work through the steps in a project you will notice that many tools use existing AudioTools functions, like FFT or LARSA, and for the tools you will see a table on the right side of the screen with various options. Here is a typical example:
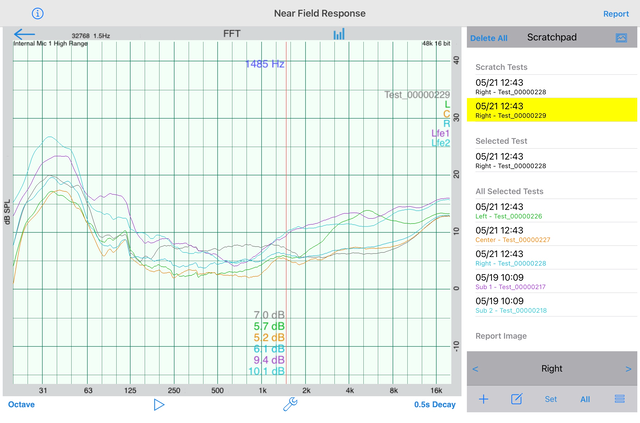
In this case, tests for 5 of the channels have been completed. For the selected channel (Right), there are two scratch tests.
The object here is to complete tests for all of the channels, and then to take a screenshot that will appear in the Report. You will build a group of Selected tests, one for each channel. These are the tests that will appear in the report.
Here is a list of Scratchpad buttons and what they do. The tool itself, FFT in this case, has its own controls, but for now we will focus on the Scratchpad functions.
- Delete All – All tests that have been done in this tool, for all channels, will be deleted. Use this if you need to start over.
- Screenshot Button – Tapping this will capture the current state of the plot window, leaving out the controls and any extra tests (not selected).
- < and > buttons – These will change to the previous and next channel, respectively.
- Channel Name (Right) – If you are linked to the Apple TV Surround Generator (below), this button changes color to indicate the state of the signal, green for on and red for off, and when tapped toggles the output on or off.
- + This button will add the current test on the screen to this channel’s list of tests. If it is the first test stored for this channel, it will be marked as Selected and added to that group. A default plot label will be applied.
- Write Buttonn – The square with a pencil in it. Tapping this button allows you to edit the plot label.
- Set – If you wish to take a new test and replace the currently selected test, run a new test, capture it with the + button, tap on it in Scratch Tests part of the table, and then tap this button.
- All – This is a display only button. It will show or hide all of the tests. After you hide all of them, you are free to tap any test and it will be displayed.
- Menu – The three-line menu button brings up some additional options for copying and pasting a test, and for deleting tests:
- Copy This Test – You can use this to capture a test on one tool, and then drop it into another tool for comparison purposes. To use this, first tap on a test in the “All Selected Tests” section, then select this option.
- Paste Test Here – Once you have copied a test, you can exit the current function, and navigate to any other tool which uses the same test type. For example, you can copy a test from one full-range FFT tool to another. In the destination tool, select any channel, and use this option to put a copy of the test here.
- Delete Test – If you run this option on a Selected Test, it will be removed from the Selected list and the plot, but the fill will not be deleted. If you run this on a Scratch test, it will delete the file, and remove it from the plot, if showing.
The idea is to run the tool, and when you have the plot that want to save for the current channel showing, press the + button. You can run multiple tests and save them, for each channel. All of the channel’s tests will appear in the Scratch Tests part of the table, and you can change the Selected test with the Set button. Then you will move on to the next channel, and repeat the process. When you have all of the tests on the plot, tap the Screenshot Button to save the plot for the report.
If you want to make changes to the report, run the new tests, and tap the Screenshot button again to update the image.
Connecting to the Apple TV Surround Generator
If you have an Apple TV4K connected to your AVR, you can configure the HAA app to automatically send audio test signals to the AVR. The signals will be correct for the tool being used, such as FFT, LARSA, or Speaker Polarity, and the channel will match the channel selected in the app.
These feature requires a 4K Apple TV, our Surround Generator for Apple TV, and the ATMOS signal pack.
Setting up the HAA App for Surround Signal Control
- Download our Surround Generator app on your Apple TV4k
- Install the ATMOS signal pack by clicking on the “ATMOS” signal selection
- Connect the Apple TV to your local wi-fi network.
- Open AudioTools, and navigate to FFT. Make sure your iOS device is on the same wi-fi network as the Apple TV
- Go to the setup page for FFT, and tap on the microphone icon
- Tap the “Link” button in the upper right corner
- Select the Apple TV from the list.
You should now get a connection notice.
Sending Test Signals to the AVR
Once you are connected you can go into the HAA module, and bring up a tool such as Speaker Polarity or one of the FFTs. You will see the selected channel name on the scratchpad, lower right corner. The channel name will be red, indicating that the signal is off.
Tap on the signal name to turn on the test signal. Tap again to turn it off.
As you change channels using the < and > buttons, the channel will also change for the Apple TV signal.
Note: You can carry a pre-configured Apple TV with you, and connect it to the local wi-fi network and use it on multiple job sites.
