Transmission Loss (TL) is a tool for measuring the insulating properties of walls, floors, or doors separating two rooms. It is based several international standards, including ISO 140-4, “Acoustics — Measurement of sound insulation in buildings and of building elements”, ISO 717-1. “Acoustics — Rating of sound insulation in buildings and of building elements — Part 1: Airborne sound insulation”, ASTM E336, “Standard Test Method for Measurement of Airborne Sound Attenuation between Rooms in Buildings”, and also ASTM E-90 for Transmission Loss (TL), E413-87 for Sound Transmission Class (STC), and E1332-90 for Outdoor-Indoor Transmission Class (OITC).
Measure Sending and Receiving room 1/3 octave levels, and also measure Reverb Time (RT) and Ambient Noise in the receiving room, if desired. Everything is computed automatically and the results appear in a professional-looking graph ready to export and add to your reports.

See our demo video for Transmission Loss:
Refer to the specifications that apply in your use to case to determine what to analyze, and for more information about setting up and performing the tests to meet the appropriate standards.
Implementation
Our implementation uses the filter-based Real Time Analyzer (RTA) and the impulse-response based Room Reverb modules to collect the data required for these calculations. Depending on the results that you require, you may not need to measure the RT time using the Room Reverb module.
TL uses the concept of a “source room”, where the test noise is present, and a “receiving room”, where the level of the test noise that propagates into the room is measured to determine the noise reduction properties of the separating element, such as a wall, floor, or door.
The basic procedure involves generating pink noise in the source room, and then measuring the levels in both the source and receiving rooms, and in some cases measuring the reverb decay time (RT) in the receiving room.
The standard suggests doing several tests at different locations in the room, and averaging these tests before computing the results. This may be done either by moving the microphone around in the room, while the RTA is in Average mode, or by doing several discrete tests and saving and recalling them into one composite test.
Operation
The test is done in two distinct steps, source room tests and receiving room tests. The selector on the screen changes the mode. When both tests are complete, switch the selector to Results to view the results of the calculations.
Make sure that you have at least 10dB greater level in the sending room, compared to the receiving room. If the receiving room ambient noise level is high in some bands, this may mean that you need a very loud noise source in the sending room.
Settings
First, open the Settings page by tapping the wrench icon on the bottom of the screen, and select the desired test format, Rw or Dntw for ISO 717, STC for ASTM E336, or OITC for ASTM E1332.
Also on this page, enter the room dimensions if you will be using the RT results, which are recommended for the ISO 717 tests.
Sending Room Levels
You will need a pink noise source in this room that can also be used when you move the microphone to the receiving room. There are several ways to do this.
- Wired connection
- Wireless link
- Remote Generator
- Other pink noise source
Set the selector to ” Send“.
Turn on the pink noise, and start the RTA running. The RTA runs in average mode (Leq), so it is constantly linearly averaging results. In this mode, you can move the microphone around the room, and the RTA will do the averaging for you automatically.
You can start a test over at any time by tapping the Reset button in the Average box, and you can pause and start the test using the Play / Pause button in the bottom toolbar.
When this test is complete, tap the Play / Pause button to stop the test. The levels shown on the red RTA bars will be used as the 1/3 octave SPL levels for the source room.
Receiving Room Levels
Leaving the pink noise generator in the source room, move the microphone to the receiving room.
Change the selector to ” Receive“.
With the pink noise running, measure the levels in this room. Use the Reset button on the Average box to start a new measurement, and use the Play/Pause button if you need to pause the test while moving the microphone.
When this test is complete, tap the Play / Pause button to stop the test. The levels shown on the red RTA bars will be used as the 1/3 octave SPL levels for the receiving room.
Turn off the pink noise generator in the source room.
Receiving Room RT Time
If you wish to also measure the room reverb decay time (RT time),
change the selector to ” RT“.
Next, tap the “Test RT” button to bring up the recording screen. If the room dimensions of the receiving room, or the size of the insulating panel (wall, floor, or door) are not correct, enter the proper values at this time. You will need to generate an impulsive sound that contains a broad range of frequencies. Often a balloon pop, or even a starter pistol is used for this purpose, although we recommend dropping a heavy book onto a hard floor surface. Tap the Record button, wait for the countdown to reach 0, and create the sound. The room should be as quiet as possible during this test, for best results. Wait a few seconds after the sound, perhaps 5 seconds. Tap the Stop button. Tap the Done button on the upper toolbar, and the calculations will be completed and the 1/3 octave response shown on the screen. When you are satisfied that you have a good test, tap Done to return to the Results screen.
Ambient Noise Levels
If you wish to correct for the ambient noise levels in the receiving room, first enable this option on the TL Setup page. If you believe that the ambient noise levels are at least 10dB below the levels with the pink noise generator turned on, you can skip this step and proceed to the Results page.
Change the selector to ” Ambient“. With pink noise turned off, measure the levels in this room. Use the Reset button on the Average box to start a new measurement, and use the Play/Pause button if you need to pause the test while moving the microphone around the room.
Now you are ready to view the test results.
Viewing Results
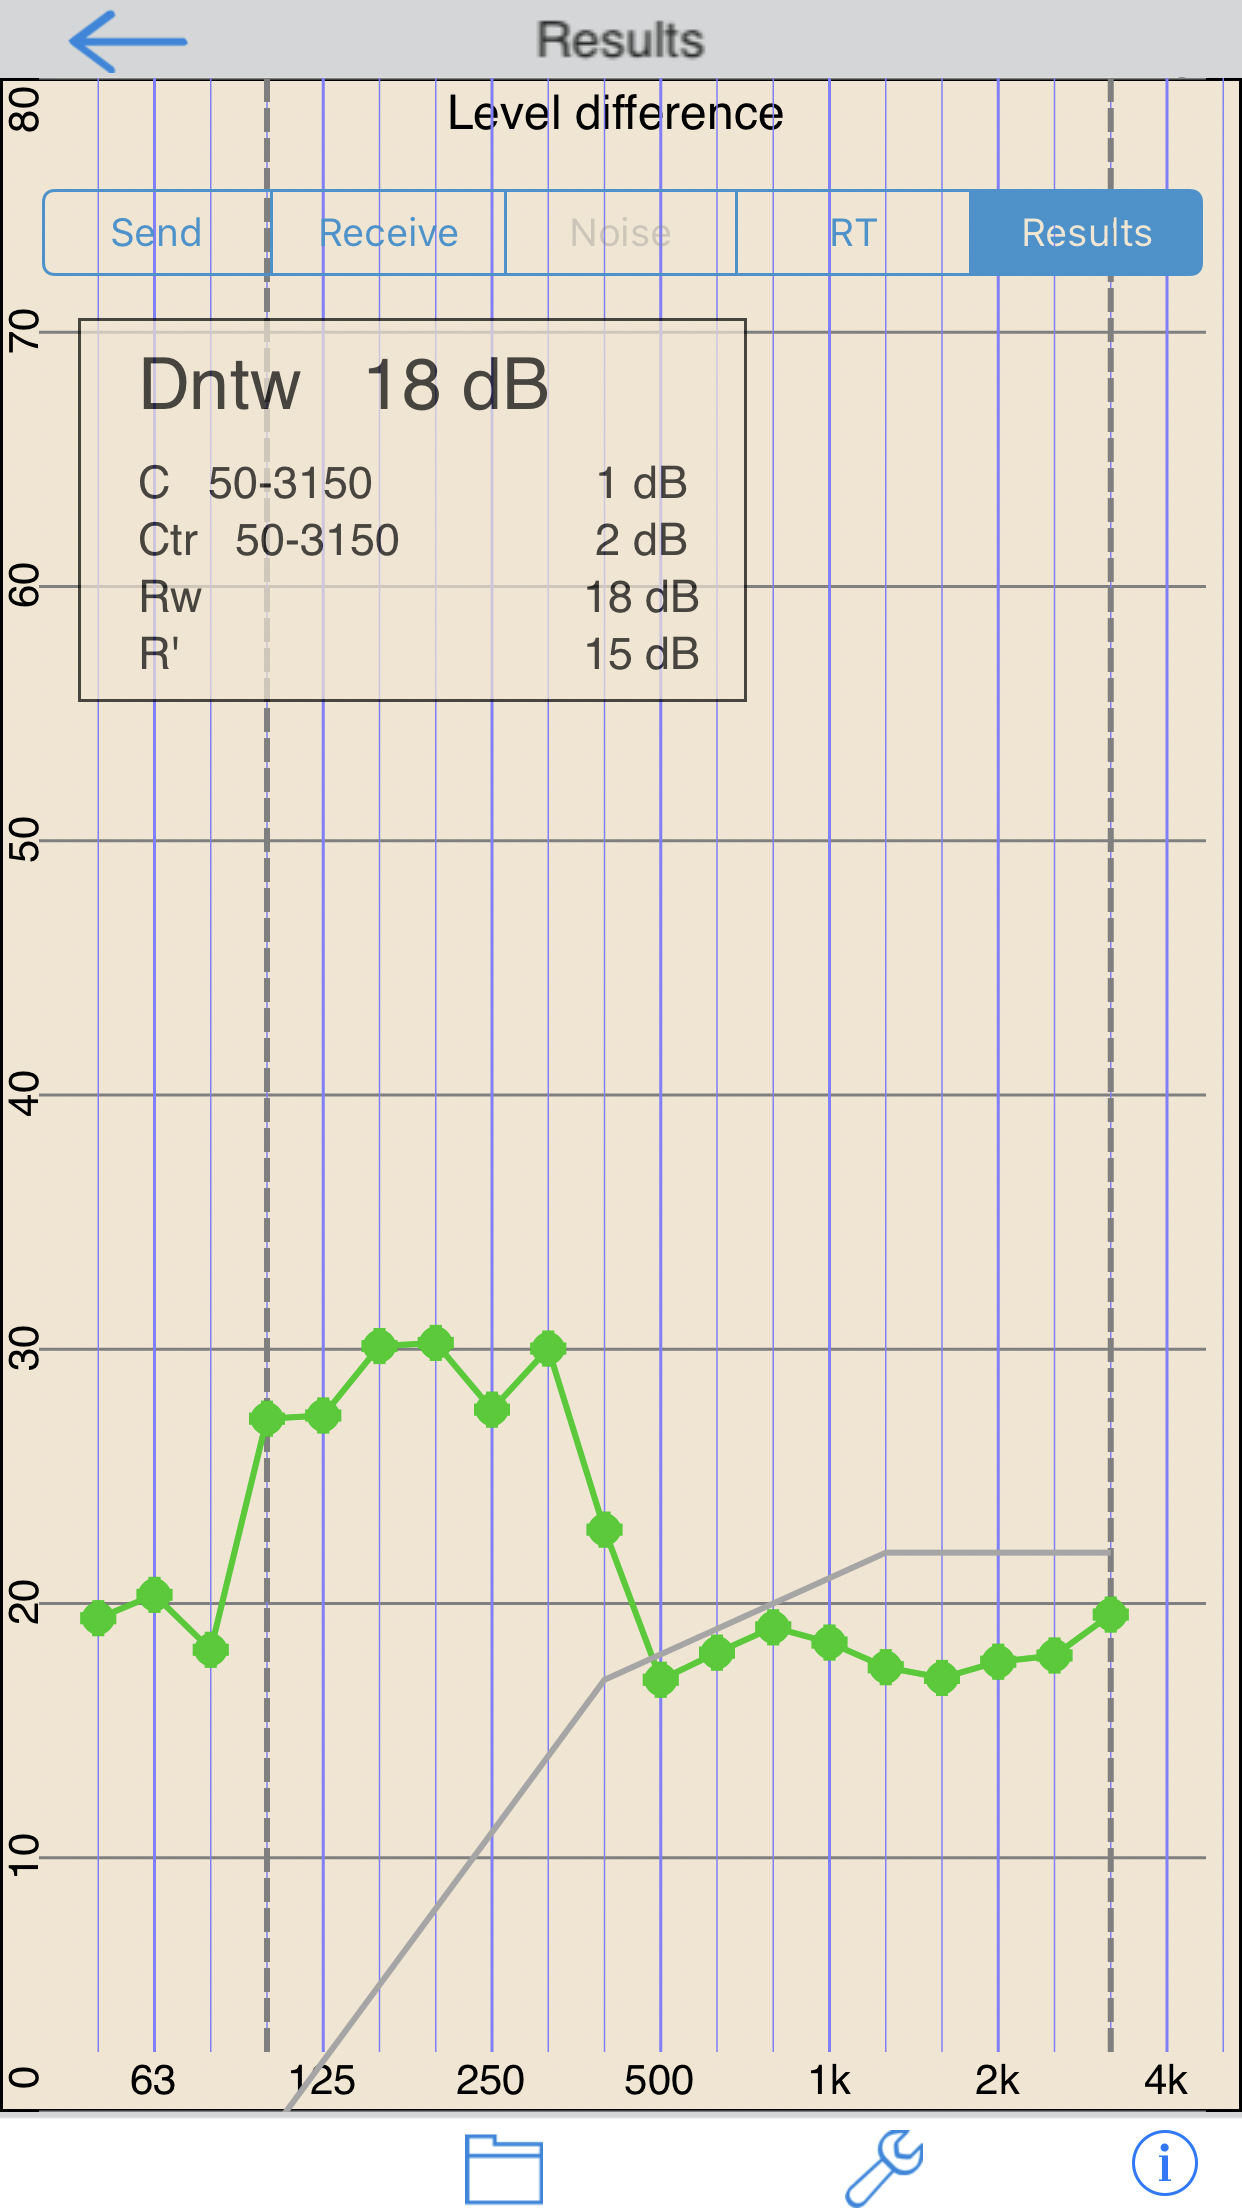
Change the selector to ” Results“. The test results will be shown here. The main plot, in green, is the level difference at each octave band. The reference curve that applies to this level difference plot is shown in grey. This curve is determined as per the spec, using a sum of deficiencies. If an RT test was done, these results are shown as 1/3 octave red bars, referred to the scale on the right side of the screen. The values box will show any computed single-value numbers, per the appropriate specification, such as Rw or STC.
Save / Recall
A number of different things can be saved and recalled, depending on what screen is active.
Saving and Recalling Level Tests
You can save a level test for either of the rooms, or the ambient noise levels, to recall later, or to add to a sum of tests.
From the Source or Receiving room page, tap the folder icon to bring up the settings page. From here, you can save the current test, which is the state of the red RTA 1/3 octave level bars, or you can recall a test that was saved previously. When you recall a test, you will have the choice of letting this recalled test fully replace the 1/3 octave levels, or having this test averaged into the current 1/3 octave levels. You can average as many tests as you like into the current test. After you have created a composite test, by averaging several individual tests, you can simply use those levels in the current evaluation, or you can save this composite into it’s own test, to make it easier to recall later.
Saving and Recalling RT Results
From the RT screen, you can tap the folder icon to being up the Save/Recall page. There you can save or recall RT time results. Note that RT results are not averaged, they always replace the current values.
Saving and Recalling TL Results
From the Results page, tapping the folder icon brings up the Save/Recall screen. From here, you can save the current results, which also saves a tab-delimited file that you can open in a spreadsheet program. All of the results, including the source and receiving room levels and RT test, if completed, are also stored here.
You can also recalled a previously saved set of results. Note that this will also recall the source and receiving room levels that were in effect when that set of results was saved.