The Reference Curves package is an option in AudioTools that allows you to compare a stored plot to the live plot, generate an EQ curve, or set a +/- dB limit to test the live curve against. You can create the reference plot in a text editor, or from a saved AudioTools test. Reference Curves are available in RTA, FFT, Impulse Response, Smaart, and Transfer Function.
The Reference Curves option may be purchased by tapping the Info button that covers the “Reference Curve” button on any of the supported modules. Once purchased, Reference Curves are then available in all of the supported modules.
You can also use this feature for production go-no go testing, to see if a piece of equipment meets spec.
This is our demo video of the reference curves options, on the FFT module.
Using Reference Curves
This document describes how to use reference curve files created outside of the app for comparing to live test measurements made in the app.
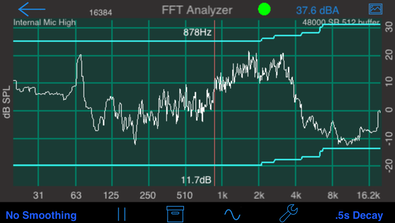
This is an example of reference curves on FFT.
Reference curves are useful if you need to compare live measurements against a pre-defined level or impedance curve, to try to match the curve using EQ, for example, or to test whether or not a piece of equipment is within spec.
Note that the settings for the Reference Curve screen are stored individually for each file type. So, you can select different reference curves and tests for FFT and Amplitude Sweep, for example, and the system will remember them for the next time you use that module.
Creating Reference Curve Files
The files used by reference curves follow the same format as microphone compensation files, which is simply a text file with two entries per line, per the pending AES standard.
Specifically, files that conform to these rules may be read in:
- File names must have either the .txt or .frd extension.
- Files must contain ASCII characters (not binary data).
- Lines must have a frequency value followed by a dB value, separated by a tab, comma, or blanks. Values may be in IEEE format, integer format, or floating point. Extra values are ignored.
- Lines must be in order of ascending frequency.
- Any number of data points may be present.
- Lines beginning with ‘*’ or ‘;’, or blank lines, are skipped.
Reference Curve Types
There are four reference curve types: Test, Dual Curves, Difference, and Invert.
Test Mode
Use Test Mode when you want to compare a live measurement to a single reference curve, with an optional +/- dB range. You can visually compare the curves, and also have the software compute a pass / fail result, based on whether or not the measurement is within the range window.
Dual Curves Mode
Use Dual Curves Mode when you want to test whether or not the live measurement is within the dB window defined by two curves that you create. Like Test Mode, the software can compute whether or not the live measurement is within the test window.
Difference Mode
In this mode, a curve will be plotted that is the difference between the live measurement and the reference curve. No testing for pass / fail is done.
When you save the file, the difference curve values will also be stored.
Invert Mode
Like Difference Mode, but the curve is inverted. This curve indicates the correction that would be required to make the live curve exactly match the reference curve.
File Format
Reference files are text files with one entry per line. Each entry will have a value and a frequency, both of which may include decimal points. The value may be separated by a space, tab, or comma. Reference files are normally used with RTA, FFT, and Amplitude Sweep, and therefore will contain dB and frequency values in Hz. Reference files may also be used with the Impedance Sweep module, and in this case the values are assumed to be Ohms and frequency in Hz.
Lines that start with an * are ignored and may be used for comments.
The filename extension must be either .txt or .frd.
There is no particular limit to the number of entries in a file, although it is recommended that you match the reference file to the resolution that you are using in the measurement. For FFT, 1/12th octave is sufficient for most purposes, and 1/3 octave is recommended for RTA. Note that if you use a 1/12th octave reference file with RTA in 1/3 octave mode, only the 1/3 octave frequency points will be used.
Importing Files
All reference curve files are stored in the same folder on the iOS device. This is the “reference” folder, which is contained in the “public” folder.
You can add files from your computer or iCloud, or you can convert stored data files in AudioTools to reference curve files.
Importing from your Computer
They method for importing data files varies depending on your storage option, internal or iCloud.
Internal Device Storage Method using the Files App
To add a file from your computer, connect to the iOS device from your browser on your computer, by opening any of the file transfer windows. There is one that can be accessed from the reference curve file selector screen, by pressing the “Files” button on the bottom toolbar.
Once you have the Files window open, enter the URL that will be shown on the iOS device screen into your browser. From there, navigate to the “reference” folder by double-clicking on it.
Now, use the Choose File button to select your reference file on your computer, and then use the Send button to transmit the file to your iOS device.
Now proceed to the “Selecting a Reference Curve” section below.
iCloud Method
First, put the file into the “reference” folder in iCloud, inside of the public folder. The full folder path is like this:
iCloud Drive/studiosidigital/public/reference
The next time that you open the Reference Curve files page, the files should be listed. If you don’t see the files, tap the Dropbox button to load them.
Now proceed to the “Selecting a Reference Curve” section below.
Converting stored data files to Reference Curve files
You can store a file in any of the supported Reference Curve modules, and then convert that file directly to a reference curve, without having to export it out to your computer first.
To do this, just tap the Local button from the Reference Files screen (the one that appears when you try to select a reference curve file). This will bring up the list of files that have been saved. Tap Import, the and file will be converted to an .frd reference curve file.
Once imported, the new reference curve file will be available from any of the reference curve screens, and will be available to any other module that supports reference curves.
Selecting a Reference Curve
To select a curve, tap the reference curve button (which will say “None Selected” before you have chosen one), and select a curve from the list that appears. This list shows all the files with txt or frd extensions that are in the public/reference folder on your iOS device. See below for instructions on importing reference curve files.
After you have selected a curve, tap the Apply button to load the reference curve.
Pass / Fail Range
You may enter a dB value in this field, for Pass – Fail testing. If no value is entered (0dB), then pass-fail testing will not occur, even if the switch is turned on.
Pass / Fail Switch
If this switch is on, the live curve will be tested against the reference curve(s), and the Pass or Fail status will be shown on the screen while the measurement is running.
Center Curves
This switch will appear in any modules with adjustable dB scales.
If the selector is set to Off, the reference curves will be drawn using the absolute levels that have been entered in the file. If switched On, the curve(s) will be centered on the dB scale of the graph. In this mode, you can slide the graph dB scale up and down to match the live measurement to the curves.
Display Curve
Turn on this switch to show the reference curves on the measurement screen, and to enable the Pass / Fail testing. All of the other settings will be saved, so you can use this switch as an enable for the Reference Curve function.
