This document describes how to use audio wave files as the data source for audio processing functions.
Audio Files
AudioTools modules normally take their input from a live input source, such as the built-in microphone or one of the external options, such as iTestMic2, iPrecisionMic, or iAudioInterface2. Starting with AudioTools 9.4, you can now use a wave file for input, for some modules. Functions that support this feature currently include RTA, FFT, SoundScope VR, SPL Pro, and SPL Graph.
Currently, only wave files using PCM format in either mono or stereo may be used for this feature.
Preparing an Audio File
The wave files must be stored in the SPL Graph public folder. All audio wave files that have been stored from the SPL Graph module will be automatically available.
If you want to use your own wave file, just copy it into the SPL Graph public folder. There are different methods to do this, depending on your file storage choice. Make sure that the file is a PCM encoded 16-bit wave file, mono or stereo, and recorded at 48k if possible. 44.1k will also work, but some functions in AudioTools expect the 48k sample rate. The files must have the “.wav” extension.
Selecting the File to Import
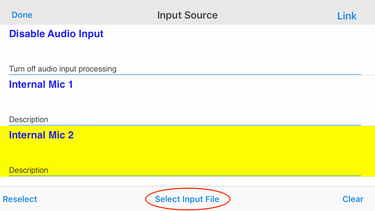
First, navigate to the Input Source page. This is accessed by tapping the microphone icon on the settings page for the module, like FFT or SPL Graph.
Next, tap the Select Input File button to bring up a picker where you can navigate the files on your device, or on iCloud, and select the wav file that you want to import. Select the file, and it will be imported and loaded.
Navigation
On the main audio analysis module screen, after you have loaded a wave file you will see a moving slider. This represents the relative position in the audio file that is currently being processed. The file will be processed from the beginning to the end, and then the position will loop back to the beginning and processing will continue. For SPL Graph, processing will begin when you tap the Play/Pause button, as you would to start live audio analysis.
You can use the slider to change the current position in the file.
Going Back to Live Audio
To return to normal real-time audio processing, go back to the Input Sources page on any of the supported modules, and tap the Clear button in the toolbar. The functions will return to live audio processing.
Re-selecting the Previous File
From any of the supported module’s Input Sources page, tap the Reselect button in the toolbar. If a file was previously loaded, it will be re-loaded.
Calibration
For external audio files, no attempt is made to calibrate the external audio to absolute dB SPL. You can, however, change the calibration that is applied to file. To do this, open the Settings->Microphone Setup page, and change the Trim value. For example, if it appears that the audio is +20 dB too high, enter a trim value 20 dB less than what is currently set.
You may wish to create a new calibration entry so that you do not alter the microphone live audio calibration. To do this, just tap the “+” on the top of the screen, and make your changes to that entry.
Also, you will probably want to disable microphone compensation, to prevent the current mic frequency compensation from being applied. This can be done globally, on the Settings->General->Global Audio settings page.