AudioTools includes a versatile and powerful system for saving and recalling test data and audio files, exporting them to a computer, and importing them into AudioTools running on another iOS device.
This feature is available throughout the app, in any module that saves a graph, and also in SPL Pro and STIPA.
Some modules can also save audio files. These include SPL Graph, Impulse Response, and the Recorder.
Complete instructions on transferring data files from one instance of AudioTools to another are available here.
Also see our Save to Photo Roll option.
Naming Files
You can name a file with any combination of up to 32 letters, numbers, and spaces. Files are stored in folders by file type (like RTA or FFT) so you can use the same file name for different types. There is no limit other than storage space for the number of files that you can store.
Storing Files
When you store a file, it is saved on the device locally. The files are backed up to your computer when you back up your device, but unless you are using iCloud, if you delete the app the stored files will also be deleted. In most cases, a tab-delimited file of the raw data will also be saved along with the data needed to restore the graph.
See the information below about transferring files to your computer.
The tab-delimited data file will have the same name that you used to store the file, with the .TXT extension. Microsoft Excel and Apple Numbers will normally open this file directly. The contents of this file will vary by file type, but will always include the date and time of the measurement, in the local time zone.
We recommend using iCloud to store your files.
Here are the files that can be saved
All of these files are stored in the “public” folder.
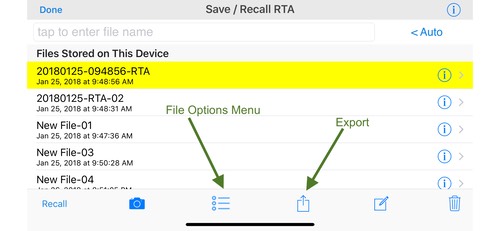
Browsing and Recalling Files
Scroll the list, and tap to select a file. It will be highlighted in yellow when selected. Tap Recall to open the file. When you recall a stored file, the information needed to redraw the graph(s) will be recalled.
Taking Pictures
If your device has a camera, you may take a photo, which is then associated with the stored file name. Tap the camera icon after selecting the file to take a picture. Each stored file can have its own photo, and will take the name of the file, with the .png extension. To see the picture, tap the circle-i icon on the right. This will bring up the info screen for the file, and you can export the image file by tapping the “Export” button.
File Options Menu
Tap the square icon with the arrow pointing up (see image above) to bring up the file options menu. This menu give you options to
Copy Selected File Name
Copies the file name to the clipboard.
View in Files App
Brings up the Apples Files app that has all the folders for the different types of tests. From here you have navigate to individual files and copy or email them if needed.
Sort Files By Name / Date
Tapping this choice will change the sort order for the file list either alphabetically by name, or by date with the most recent files on the top of the list.
Auto-Save Options
Set the Auto-Save Options for the current module, such as RTA or FFT.
Clear Recalled Graphs
For some modules, this will remove previously displayed store graphs from the main screen.
Delete All Files in List
As it says, this will delete all storage for the current module. So, if you are in the FFT module, all FFT data and result files will be deleted.
Export Button
The square icon with the arrow pointing up lets you export the current selection to another application, such as Excel or Numbers, or to send the file using email, a message, or many other apps. It also allows you to save the file locally to the Files app, or copy it to Notes. The options available will depend on exactly what apps you have installed.
This button lets you export one file at a time, to move multiple files, look at using iTunes File Sharing or iCloud. More information about these below.
Storing a Note File
Tap any file name to highlight it on the screen, and then tap the square button with a pencil in it. This will create a text note with the same base filename as the stored file, and the extension “.log”.
Deleting Files
When you delete a file, all files associated with that file name are deleted. This may include graph data, tab-delimited data, a photo, a notepad, and in some cases audio.
Using the Files App
The Files app, which is available since iOS 11, will allow you to directly access the files saved in AudioTools whether you are using the internal storage mode or iCloud. Use the options menu (described above). This will open the “public” folder, and you will find folders for any module, like RTA or FFT, as well as the calibration and reference folders. You can also access this through the Utilities->Files menu.
iCloud
iCloud is fully supported in AudioTools, and is the recommended storage method. Using iCloud, all of your files are automatically copied to your computer, and other iOS devices on the same iTunes account can also open them. As you save data out in the field, a co-worker back in the office can open them.
Additional Media Files
If there are additional files that have been created, they will appear in the same folder, with different extensions, such as .wav, .aif, or .caf for audio files, .txt for notepad files, and .jpg or .png for image files.
GPS Location
The current latitude and longitude coordinates are stored along with the data. The location will be shown in your tab-delimited file. This feature uses the location services of your device. Note that it will often take several seconds for accurate data to be obtained. Location data is shown when you browse to a stored file.